Its been some time since i have updated this so this one is a long one…
I have finally taken the plunge and the conversion kit is here. It was picked up from Bingley Hall Mini show last weekend. Specialist components were showing some quality engineered products and an array of nice engine set ups. One being a 16v conversion with a supercharger bolted up to it with power graphs to show power outputs of around 240bhp. The price at 11,000 – 12500GBP is just slightly (not) out of my price range and the power outputs would be far to much for the car i have. But all in all it was an absolute monster. I’d like to know from SC maybe after some road or race tests how the gearbox holds up to these figures. There was a conventional mini head setup showing the use of there typhoon injection system utilising some very nice design and manufacturing. If you wanted to keep the A series engine as standard as possible but convert to injection this is the way i would be going. The below pictures show the SC 240bhp animal.
- SC 240BHP
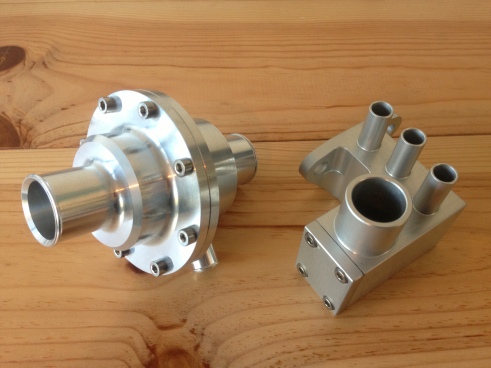
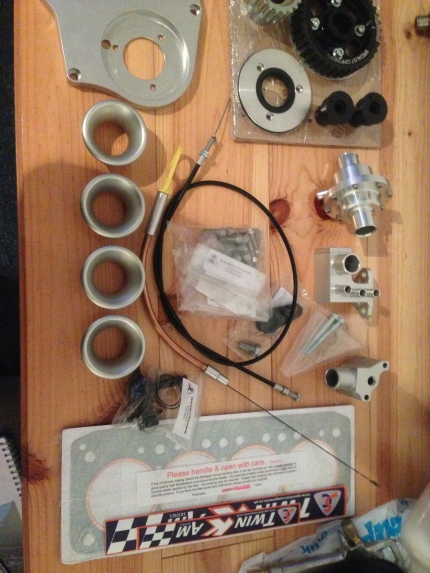
So the pistons were dropped off with SC at Bingley to have the pockets cut into them. My rocker cover has also been handed over to have the cam chain end machined flat to seal against the SC front plate. SC offered me some superb discounts on the day so i picked up most of the parts from them that i needed to get the engine head built up.I purchased a; Conversion kit, ancillaries kit, 0.6mm head gasket and a remote thermostat. Pictures below show the parts that are now ready to be built up onto the block. The quality of the components is shown in the pictures – amazing!
Another item i found was from RetroSport. I had originally planned to blank the dizzy port in the block with a alloy insert and use the original A+ dizzy clamp to lock the insert down to the block. After picking up a dizzy clamp in the auto jumble I stumbled across a blanking plate that looked so much nicer than what i was going to use. At £12 it wasn’t cheap but i have realised now that if you want it to look right you have to spend the money to get it so below shows the RetroSport item and to the right the setup i was going to use. No brainer really??????
I dont take a lot of pictures these days at mini shows as some cars that people produce and seem to like to show off don’t press any buttons of mine. But who ever built this tweed grey retro racer needs a big pat on the back. I would love to of found out who built it and chatted to them about how they had done a few things. The editor of Mini magazine has been informed of this blog so Jeff (if you’re reading this) pass on my regards to the owner. Absolute stunning car, best car i have seen in a few years an in my favourite 60’s colour.
It looks pretty standard to most but as i looked around it you noticed small changes that the owner had made to improve that 60’s look with a modern twist. I loved the detail that the owner had gone to just to fit the bonnet straps. Instead of going over the top of the MK3 chrome bonnet strip, they had reduced the width on the chrome bonnet edge and gone between the hockey stick and the now shorter bonnet strip. I wish i had got a picture of this now as i have never seen this done before but it looked so much neater than “the over the top” method. The front indicator lenses had been changed to clear flat types and various other small changes have been done to produce something that i would love to own. Carbon bumpers and the interior!!!!…. enough said.
The only small floor i could find was someone had tightened its door window lower chrome strip mounting bolts too tight and caused the chrome to deform. Picky i know but other than this perfect!!!


hi
nice blog… Sometime next month I am taking delivery of my SC engine with ported head and LT cams… British Raging Green.
Regards from The Netherlands,
Lluís
Hi, thanks for the kind words about my car!
It’s a Mini Magazine project car that I’ve been building for some years now. I think it’s been off the road for about 3 years.
The window strip you mentioned I may re-do. It’s the only way I could manage to tighten the windows in place as they’re alloy doors with modified tops and it’s all a bit non-standard.
Check out our Youtube channel or most issues of the magazine and I do regular build updates.
Stephen,
Mini Magazine
Hi Stephen.
Thanks for dropping in a comment. Im surprised that this message actually found its way to the person it was intended! Great news that it eventually did. Well as i stated you made an amazing job of your car. I was extremely impressed of the vision that you had created. Im a sucker for that tweed grey and i haven’t been to many shows over the last few years so haven’t seen that many cars painted in it.
I have polycarbonate windows in my car but i’m using std doors and skins so my outer chrome weather strips are held in with original design clips.
Anyway enjoy driving your car and all the best.
Adam